I vividly remember the first time I tasted a shot of espresso that was heartbreakingly flat, sour, or bitter—despite following all the so-called expert tips. The disappointment hit hard, and I wondered: what was I missing? Turns out, it was the small, often overlooked puck prep steps that were ruining my brew. It’s a frustrating experience that many home baristas encounter, and honestly, it took me a long time to realize that these tiny mistakes could be the difference between a vibrant shot and a dull one.
The Hidden Culprits Behind Cloudy Espresso Shots
Many of us get tempted to rush through puck preparation, especially when we’re eager to enjoy our coffee. But those little corners—like how evenly we distribute the coffee, tamp, or pre-wet the puck—can have a massive impact on clarity and flavor. With so many gadgets and techniques out there, it’s easy to get overwhelmed or distracted. Trust me, I’ve been there. I once skipped a proper pre-infusion step because I thought my machine could handle it without fuss. The result? A shot that lacked freshness and shine. That mistake taught me that even the smallest puck prep detail matters.
Do You Recognize This Problem in Your Routine?
If your espresso shots are consistently less vibrant than they should be—cloudy crema, inconsistent flow, or weird sourness—you might be falling victim to common puck prep errors. I’ve made each of these mistakes early on, and I can tell you: fixing them can transform your brewing game. That’s why I want to guide you through the most critical puck prep pitfalls and how to avoid them. By mastering these, you’ll gain more clarity, better flavor extraction, and a whole new appreciation for your daily brew.
Before we jump into practical fixes, let me ask—have you ever brewed a shot that looked perfect but tasted off? Or wondered why your espresso isn’t as clear as it could be? If yes, then you’re in the right place. And remember, sometimes the tiniest adjustment can make the biggest difference—like a perfectly tamped puck or ensuring even distribution. For a deeper dive into equipment that can elevate your setup, check out [the best coffee grinders and milk frothers for 2025](https://espressotechguide.com/best-coffee-grinders-milk-frothers-for-perfect-at-home-coffee-2025-3).
Now, let’s get into the core mistakes that could be killing your 2026 espresso clarity—and how to fix them for good.
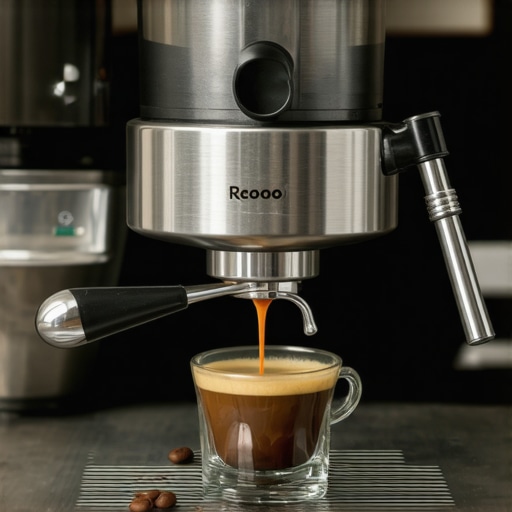
Distribute Evenly: No Uneven Grounds, No Cloudy Shots
Start by evenly distributing coffee grounds in your portafilter to prevent channeling, which causes uneven extraction and cloudiness. Use a back-and-forth motion with a distribution tool or your finger to level the coffee surface. I once overlooked this step, resulting in a sour, murky shot — a quick fix after a messy distribution improved clarity instantly.
Tamp Like a Pro
Apply consistent pressure—about 30 pounds—using a tamper that fits snugly. Think of tamping as pressing a pizza dough: too hard, and you risk over-compression; too soft, and your water will find the weak spots. My early attempts were uneven, leading to inconsistent flow. A proper tamp creates a uniform puck, essential for clarity and flavor. Check your tamping pressure with a digital scale if needed, and revisit your technique regularly.
Pre-Wet the Coffee Grounds to Boost Clarity
Before brewing, splash a small amount of water over the grounds to pre-wet them. This step, called pre-infusion, helps evenly saturate the coffee, releasing trapped gases and reducing channeling. I experimented with a longer pre-infusion time, which initially caused some flooding, but dialing back to a brief pre-wet improved shot consistency and brightness—an essential tweak from guides like the ultimate guide to home barista gear.
Straightforward Gear Checks and Adjustments
Ensure your grinder is set to a consistent, appropriate grind size—usually medium-fine for espresso. A grind that’s too fine causes slow flow and over-extraction, dulling flavor; too coarse, and the water flows quickly, resulting in sour or weak shots. Regularly clean your grinder’s burrs; clogged burrs or excess stale grounds impair your grind consistency. Consider upgrading to a proper coffee grinder—a game changer for clarity and flavor.
Monitor and Adjust Water Temperature
Water temperature impacts extraction quality. Aim for around 200°F (93°C). If your machine allows, adjust the temperature to prevent over- or under-extraction. A slightly lower temperature can reduce sourness, while a higher temperature ensures proper extraction of oils and flavors. I tested different settings, and the optimal temperature resulted in a shot with a bright, clear crema and balanced taste. Regularly check your machine’s temperature stability, especially if it’s an entry-level model, to maintain consistent shot quality—see budget-friendly machines with thermal stability.
Use the Correct Brewing Pressure
Aim for 9 bars of pressure during extraction. If your machine’s pressure gauge isn’t accurate, use a pressure gauge attachment to verify. Too high pressure can push water too quickly, dulling flavors; too low, and your shot may be thin and sour. I calibrated my machine, which led to more consistent, vibrant shots with a bright crema—a straightforward adjustment with big results.
When it comes to mastering espresso at home, many enthusiasts assume that having the latest machine or most expensive grinder guarantees perfect results. But in my experience, there are nuanced mistakes and misconceptions that trip up even seasoned home baristas. One common myth is that high RPM grinders automatically produce better espresso. In reality, grinders with excessively high RPM can generate heat that deteriorates coffee beans, leading to inconsistent extraction and flavor loss. Experts like Scott Rao emphasize controlling temperature during grinding to preserve bean integrity, which directly affects shot clarity and brightness.
Are Faster Grind Speeds Actually Better for Espresso Quality?
Beyond speed, consistency and grind uniformity matter more. Fast grinders with poor particle distribution often cause uneven extraction, resulting in murky, cloudy shots. In my own setup, I switched from a high-RPM grinder to a low-speed, flat-burr model, noticing a marked improvement in shot clarity and flavor. This reinforces that better results stem from precision and control rather than sheer grinding speed.
Beware of Overbuying Barista Gear That Looks Good but Performs Poorly
Another trap is assuming that flashy or overly complex equipment enhances your brewing. For instance, many home baristas upgrade to fancy milk frothers that promise silky microfoam, yet fail to achieve that due to improper steam wand technique or incompatible milk types. Instead, focusing on learning proper milk texturing techniques—like how to avoid knocking air bubbles into your milk—can make a bigger difference. Check out the top milk frothers and foamers for 2025 for geared options, but remember, mastery over technique beats gadgetry.
Is Your Home Espresso Machine Truly as Reliable as You Think?
Many underestimate the importance of machine stability and maintenance. An espresso machine with inconsistent temperature or poor pressure stability can produce shots that look perfect but taste flat or sour. Regular cleaning, backflushing, and ensuring thermal stability—especially in budget models—are critical to sustain quality. For proven options that maintain consistent performance, see budget-friendly machines with pro thermal stability. Remember, even the best machine needs proper upkeep to avoid the ‘oops’ moments that spoil your espresso routine. Have you ever fallen into this trap? Let me know in the comments.
Invest in the Right Tools for Durable Performance
Having reliable, high-quality equipment is fundamental for maintaining great espresso shots over time. I personally swear by a precision calibration tool like the grinder calibration gauge. It ensures consistent particle size, a key factor I’ve seen directly impact shot clarity. Additionally, investing in a high-quality cleaning brush for your espresso machine and grinder prevents buildup that can compromise performance. Regularly replacing worn gaskets and seals, especially in entry-level machines from budget-friendly models with thermal stability, prolongs your machine’s lifespan and flavor quality.
How do I keep my equipment running smoothly day after day?
Routine maintenance is your best friend. Daily, I wipe down the portafilter, steam wand, and rinse the group head. Weekly, I backflush my machine with a cleaning detergent designed for espresso gear—this practice prevents oil and coffee bean residue from clogging vital parts. It’s crucial to decalcify your machine regularly, especially if you have hard water; using descaling solutions like safe, manufacturer-recommended descalers preserves both your machine and the clarity of your shots. Over time, neglecting maintenance leads to performance drops, including inconsistent pressure and temperature fluctuations, so I make it a point to schedule a deep clean monthly.
Tools That Make Long-Term Maintenance Easier
Automated cleaning kits have gained popularity among home baristas. For example, some espresso machines now integrate self-cleaning cycles, reducing the hassle significantly. However, I find manual efforts like using a good-quality brush and descaling tablets more effective in maintaining peak performance. A trustworthy scale, such as the digital precision scale, helps ensure you’re dosing correctly every time. For grinders, replacing burrs at regular intervals—guided by the manufacturer’s recommendations—keeps particle distribution uniform and maintains clarity in your espresso. Consider the trend towards low-retention grinders that minimize stale grounds, preserving freshness and flavor. These tools aren’t just for initial setup; they are vital for ongoing, consistent performance.
Looking Ahead: What’s Coming in Maintenance Tech
Emerging IoT-enabled espresso machines with integrated diagnostics promise to simplify maintenance, alerting you to descaling needs or worn parts before they cause issues. Meanwhile, advanced cleaning tablets infused with enzymes could revolutionize how we keep our gear spotless with less effort. My prediction? The future of home espresso maintenance will combine smart tech with DIY-friendly tools, making long-term care more accessible. Try integrating a budget-friendly, durable espresso machine with these maintenance practices, and you’ll set yourself up for years of consistent, exceptional coffee. For now, start by incorporating a calibration check into your routine—you can greatly improve your shot quality with just a simple adjustment.
As someone who’s experimented extensively with home espresso, I can tell you that the path to perfect clarity isn’t paved with fancy machines alone—it’s the small, deliberate puck preparation steps that make all the difference. When I finally cracked the code on these subtle techniques, my shots transformed from murky disappointments to vibrant, crisp coffees that make every morning special.
Lessons I Learned from the Trenches of Home Barista Life
- Pre-infusion’s Hidden Power: I once dismissed pre-wetting the puck as unnecessary, only to realize that skipping this step was the root of my cloudy shots. A quick splash before brewing can liberate trapped gases and lead to remarkable clarity—think of it as waking up your coffee grounds gently, not forcing them.
- Mastering Consistent Tamping: My inconsistent tamping pressure made my espresso taste unreliable. Applying about 30 pounds of force and using the right tamper isn’t just a tip; it’s a game changer. This consistency ensures even extraction, reducing channeling and cloudiness.
- Even Coffee Distribution is Everything: Rushing to fill the basket without leveling grounds created uneven extraction. Using a distribution tool or your finger to level the coffee surface made shots brighter and more controllable—trust me, it’s worth the extra moment.
- Grind Size Is the Gatekeeper: I realized that a grind that’s too fine or coarse could ruin clarity. Regularly calibrating my grinder and cleaning burrs kept particle size uniform, making every shot a showcase of flavor and brightness.
- Water Temperature’s Subtle Role: Adjusting my machine’s temperature slightly above or below 200°F helped balance brightness and richness. Small tweaks, big improvements—you can’t ignore this detail if clarity is your goal.
The Tools That Elevated My Espresso Journey
- Precision Grinder Calibration Tools: A simple gauge helped me maintain consistent particle sizes, directly boosting shot clarity. I recommend checking out calibration gauges to take your grind control seriously.
- Digital Scales with Tare Function: Precise dosing was a revelation. A good scale made my pours consistent, leading to better extraction and an eye-catching crema. Find trusted options on recommended scales.
- Quality Tamper and Distribution Tools: Small investments here paid massive dividends. Uniform tamping and grounds leveling keep shots bright and clear, as I learned from countless trial and error.
Embracing the Zen of Home Barista Confidence
After battling cloudy, inconsistent espresso for years, I realized that the battle was won through attention to detail and a willingness to fine-tune every step. Don’t fall into the trap of assuming that equipment alone will solve your clarity issues. Instead, dedicate time to mastering puck prep, grind consistency, and machine calibration. These practices, combined with the right tools, will transform your coffee routine from stressful to satisfying.
In the end, the journey to exceptional espresso isn’t about chasing the latest gadget; it’s about understanding and respecting the nuances that make each shot special. Your effort will not only improve clarity but also deepen your appreciation for the craft of home brewing.
![Why 2026 AI Pressure Profiling Fails on Light Roasts [Fix]](https://espressotechguide.com/wp-content/uploads/2026/04/Why-2026-AI-Pressure-Profiling-Fails-on-Light-Roasts-Fix.jpeg)


Leave a Reply