Have you ever pulled a shot of espresso that just wouldn’t cooperate? The grind clumps together, making your coffee look more like a dense block than the light, fluffy crema we all crave. I’ve been there—frustrated, wasteful, and convinced I was doing something wrong. That rough, uneven grind sabotages the whole experience, leaving you with bitter or under-extracted shots. But here’s the thing: I finally cracked the code after countless trial-and-error sessions, and I want to share the methods that truly work.
Why Clumping Is the Silent Killjoy of Modern Home Baristas
Clumping in coffee grinders is more than just an annoyance—it directly impacts flavor, texture, and even the longevity of your gear. When coffee grounds stick together, your espresso pulls become patchy, with inconsistent pressure and extraction. This can lead to a metallic taste, which many recent studies associate with uneven particle dispersion (see [here](https://espressotechguide.com/why-your-2026-espresso-shots-taste-metallic-3-easy-fixes)). Plus, persistent clumping can damage your grinder over time, forcing you to replace parts sooner.
Imagine investing in a high-end espresso machine only to have your grinder sabotage every shot. It’s like building a house on a shaky foundation—it simply won’t work as it should. That’s why understanding how to prevent and clear grinder clumps is essential for achieving those perfect, barista-quality drinks at home.
And trust me, this isn’t just a minor frustration. For many, clumping leads to wasted beans, inconsistent taste, and a lot of unnecessary cleaning. If you’ve been battling static, uneven grounds, or clumps that just won’t break apart, you’re not alone. I used to think it was just the way my grinder was—until I discovered proven techniques that transformed my brewing.
Are you tired of fighting with your grinder every morning? Do you wish for that silky, microfoam microbalance instead of a static mess? Well, good news. The solutions I’ll share are simple, effective, and designed to fit into your routine without requiring expensive upgrades.
Now, let’s get into the strategies that will keep your coffee grounds flowing smoothly, ensuring every shot is as fluffy and flavorful as it should be. Ready? Here’s where the journey toward clump-free espresso starts.
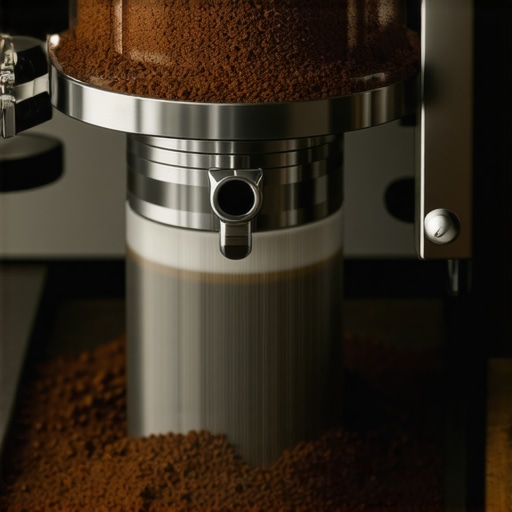
Adjust Your Grind Size for Consistent Grounds
Start with a slightly coarser grind if you notice clumping. When I first experienced stubborn clumps, I dialed my grinder to a medium-coarse setting. During my next brew, the grounds poured more freely, and the espresso’s crema improved dramatically. Remember, small adjustments can make a big difference—think of it like tuning a musical instrument until it sounds just right.
Optimize Your Grinder’s Packing and Loading Technique
Always load beans into the hopper gently, avoiding overfilling, which can cause uneven feeding and static buildup. When I transferred beans with a slow scoop, I reduced static and clumping. Use a spoon or funnel to prevent knocking beans around, which can generate static and encourage grounds to stick together.
Practice Regular Cleaning to Remove Residual Oils
Oil buildup on burrs and chambers is a common culprit for grounds sticking and forming clumps. I schedule a quick clean every week, using a dedicated grinder brush and grinder cleaning tablets. This not only reduces clumping but also preserves the grind quality over time. Think of it like cleaning your lenses for a clearer view.
Utilize Anti-Static Measures During Grinding
Static electricity causes grounds to cling together and stick to the chamber walls. I discovered that slightly humidifying my environment with a room humidifier reduced static effectively. Additionally, some baristas spray a small amount of water into the hopper—just enough to dampen static without affecting the beans—resulting in smoother grounds.
Upgrade to a Low-Retention Grinder or Use Dosing Funnels
Grinders with high retention often cause grounds to stick and clump during refills. When I switched to a grinder with a lower retention rate, I experienced fewer static issues. Alternatively, employing a dosing funnel directs grounds neatly into the portafilter, reducing mess and static buildup. For insights on choosing the right grinder, check this guide to the best home espresso grinders.
Master Proper Dosing and Tamping Techniques
Evenly distributed, well-tamped coffee prevents uneven extraction and minimizes grounds shifting and clumping during brewing. I use a calibrated tamper and distribute grounds with a whiskey barrel-style tool. This ensures consistent puck density, reducing gaps where grounds can settle and form clumps. For more tips, visit this puck preparation guide.
Many home baristas assume that simply owning top-tier espresso machines or premium grinders guarantees perfect shots. However, misconceptions abound about what truly makes a great cup. For instance, the popular belief that high RPM grinders always produce better results is misleading; in reality, faster grinders often generate more fines, leading to over-extraction and bitter flavors, as highlighted in recent studies on grind particle size distribution. Moreover, several enthusiasts overlook the significance of grinder burr quality and its impact on consistency, sometimes opting for cheaper models that cause uneven grounds and metallic tastes—if your shots taste off, check out this article on metallic flavor causes.
Contrary to common assertions, expensive espresso machines aren’t foolproof. Many believe that PID controllers and heat exchange systems alone guarantee temperature stability; yet, improper preheating or neglecting backflush routines can compromise extraction quality. The secret lies in mastering small details—like ensuring the machine’s group head is properly saturated before brewing—and these nuances often separate good shots from excellent ones.
Have you ever fallen into this trap? Let me know in the comments.
Why do many people struggle with milk frothing despite owning high-end steam wands? The answer is often the overlooked techniques of jug positioning and frothing temperature, rather than just equipment quality. Advanced baristas tend to focus on microadjustments—such as adjusting the angle of the pitcher during steaming—to achieve those silky microfoams essential for latte art. Also, static buildup on cheap milk frothers leads to inconsistent foam textures; employing anti-static techniques or choosing models with better insulation can make a notable difference, as discussed in our milk microfoam guide.
What about grinders? Many underestimate the importance of burr geometry and its influence on grind uniformity. While conical burrs are popular, flat burrs with precisely aligned edges often produce more consistent grounds, especially when paired with low-retention designs that prevent leftover fines from contaminating fresh grounds. Remember, static and retention issues are not just annoyances—they affect brew clarity and flavor. If static is sabotaging your grind, consider environment control or modifications discussed in this setup guide.
Additionally, beware the misconception that more expensive gear automatically leads to better results. In many cases, user technique and maintenance take precedence over price tags. Regular cleaning, calibration, and focus on grind settings often yield more significant improvements than splurging on the latest high-end machine.
Let’s not forget that understanding your equipment’s nuances allows you to troubleshoot effectively—saving time and beans. Mastery of small adjustments, combined with knowledge of common pitfalls, elevates your home barista game from amateur to professional. Want to dive deeper into optimizing your gear? Check out our comprehensive buyer’s guide, and share your experiences or questions below.
Keep Your Equipment Running Smoothly with the Right Tools
Investing in quality tools is essential for maintaining your home espresso setup. I personally rely on a dedicated grinder cleaning brush, which allows for detailed removal of coffee oils and residue from burrs and chambers. Regular use of this brush ensures my grinder remains free of buildup that can cause static and uneven grounds, ultimately preserving flavor clarity. Additionally, I use grinder cleaning tablets every few months to dissolve stubborn oils and prevent clumping, which is crucial for consistent extraction. Having a precise calibration tool, like a burr gauge, helps me quickly verify and adjust grind size over time, avoiding the pitfalls of burr wear—particularly relevant as burrs can degrade after processing thousands of shots.
Prioritize Preventative Maintenance for Long-Term Success
Consistent maintenance extends the lifespan of your equipment and keeps your coffee tasting top-notch. For espresso machines, backflushing with a dedicated cleaning solution and a blind filter is a game-changer, removing accumulated oils and debris that compromise flavor and hardware longevity. I schedule a deep clean every month, which involves disassembling removable parts and inspecting seals for wear, preventing leaks and pressure issues. For milk frothers, regular checkups of the steam wand gasket and nozzle keep microfoam silky and consistent. Think of maintenance as tuning your favorite instrument—small, regular adjustments make a night-and-day difference in performance.
Which Tools Are Worth Your Investment for Maintenance
High-quality, dedicated tools save time and improve results. For grinders, I recommend a precision burr gauge to monitor wear and calibrate properly, avoiding bitter over-extraction caused by dull burrs. A cleaning kit, including grinder cleaning tablets, brushes, and microfiber cloths, ensures every component stays pristine. Firmware updates and calibration software are invaluable if your grinder or machine supports digital controls; I regularly update my equipment’s firmware to benefit from performance improvements—check your user manual for guidance. My tip: always keep spare seals and gaskets on hand, so when a part inevitably wears out, you can replace it quickly and keep brewing without hiccups.
How do I maintain my gear over time?
Consistent cleaning routines, timely replacements of worn parts, and proper calibration are the trifecta of equipment longevity. I find that dedicating a few minutes after each brew session to wipe down surfaces and check for residue prevents major issues down the line. Incorporate monthly deep cleans for burrs and seals, and keep spare parts ready to swap in. Actually, implementing a scheduled maintenance checklist helps me stay on top of this routine—making sure my gear performs like new for years to come. As the trend in home barista gear shifts toward smarter, IoT-enabled components, future tools will likely include automated calibration systems, helping even hobbyists keep their setups in peak condition effortlessly. Take the leap now and try calibrating your grinder with a burr gauge—it’s a simple step that yields instant improvements in shot quality.
The Unexpected Pitfalls That Taught Me the Most
One of the toughest lessons I learned was that even the best equipment can’t compensate for poor technique. I used to believe that investing in high-end grinders and machines would automatically produce perfect shots. However, I realized that neglecting proper routine maintenance and grind adjustment often led to stubborn clumping and inconsistent flavor. This insight pushed me to refine my approach, emphasizing consistent cleaning and precise grind tuning, which dramatically improved my espresso quality.
Gear You Can Trust for Lasting Results
For those serious about perfecting their espresso, I recommend tools like a precision burr gauge to monitor burr wear, a dedicated grinder cleaning kit, and a high-quality tamper. These investments help maintain grind consistency and prevent issues like static and oil buildup. Personally, I rely on these essentials—they’ve become my secret weapons for achieving barista-level shots at home.
Ignite Your Passion, One Shot at a Time
Embarking on the journey to flawless espresso might seem daunting, but remember: each small adjustment brings you closer to that perfect crema and balanced flavor. Don’t be afraid to experiment with grind settings, cleaning routines, or static reduction techniques. The joy of brewing your own espresso lies in the learning process—so take the leap, stay patient, and savor every caffeinated victory. Your home espresso adventure is just beginning, and with persistence, you’ll unlock results that inspire!
![Why 2026 AI Pressure Profiling Fails on Light Roasts [Fix]](https://espressotechguide.com/wp-content/uploads/2026/04/Why-2026-AI-Pressure-Profiling-Fails-on-Light-Roasts-Fix.jpeg)


Leave a Reply