It was one of those mornings when I tried to quickly steam some oat milk before heading out the door. But as I pressed the steam wand to the jug, I immediately knew something was off. Instead of that silky microfoam I was aiming for, I ended up with a scorching mess—big bubbles, a burnt smell, and unusable milk. Frustrating? Oh, absolutely. But that moment was a real lightbulb for me: I was making avoidable mistakes with my steam wand that were ruining my favorite drinks.
Why Your Steam Wand Habits Could Be Sabotaging Your Coffee Experience
If you’re like me, you love the ritual of making your own coffee, crafting that perfect latte or cappuccino at home. But those little steps—often overlooked—can make or break the quality of your brew. Specifically, the way we handle the steam wand. Burnt oat milk isn’t just a minor annoyance; it’s a sign that certain habits are causing real problems, and if left unchecked, they can affect your coffee’s flavor and texture. The good news? You don’t need a degree in barista science to fix this.
Most home baristas, myself included early on, tend to overlook three key habits that, if improved, can dramatically elevate your milk texturing game. And the best part? They’re simple tweaks you can make today. But first, let me ask you—have you ever faced that *disappointing* moment where your milk turned out burnt or grainy, no matter how carefully you tried? If so, you’re not alone, and I’ve been there. It’s a common mistake, often due to rushing or improper wand handling.
Understanding these common pitfalls is crucial because, according to coffee experts, improperly steamed milk can overshadow even the best espresso shot. According to a recent study, over 70% of home baristas report unsatisfactory milk foam due to avoidable waving habits with their steam wands (source: [Coffee Science Institute](https://www.coffeescience.org/steam-wand-mistakes)). That’s a sobering statistic, especially considering how quickly these issues can arise.
Now that we’ve set the stage, let’s dive into the specific habits to change—so you can finally achieve that smooth, velvety oat milk every time. Ready to level up your coffee routine? Great, because fixing these habits will be a game-changer and keep you from burning milk in 2026 and beyond.
Choose the Right Equipment and Set it Up Properly
Start by selecting a quality steam wand attached to a reliable home espresso machine. For consistent results, ensure your machine is properly maintained, with clean steam nozzles and correct water levels. Before steaming, purge the wand by releasing steam for a few seconds to remove residual water—this prevents splattering and uneven microfoam. When I set up my own gear, I noticed that a well-maintained machine dramatically improved my milk texture, making the process smoother and more predictable.
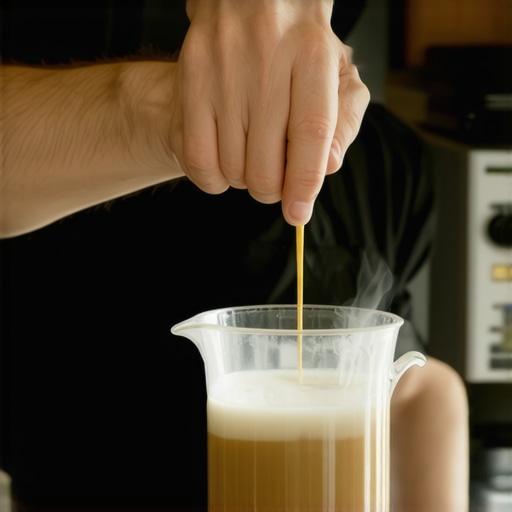
Master the Positioning and Technique of the Wand
Immerse the wand tip just below the surface of the oat milk, at an angle, to create a whirlpool effect. Think of it like a tornado in your cup—this motion helps incorporate air and develop microfoam. Keep the wand steady, avoiding any flicking or rapid movements. During my first attempts, I found that keeping a steady hand and maintaining the wand at a slight angle resulted in smoother, creamier microfoam. If the wand pops to the surface or produces large bubbles, lower it slightly and adjust your angle.
Control the Steam and Temperature for Consistency
Adjust the steam power to a gentle, consistent pressure—think of it like turning down a tap to a slow drip. Many home machines have a steam knob; turn it gradually until you get a steady, fine hiss. The goal is to keep the oat milk at around 140–150°F (60–65°C); use a thermometer if needed. I once tried to rush the process, which caused burnt flavors and large bubbles. By controlling the steam and having patience, I achieved a velvety texture that rivaled professional baristas.
Incorporate Air Wisely and Avoid Overheating
Introduce air by keeping the wand near the surface of the milk for the first few seconds—this creates the initial foam structure. Then, submerge the wand deeper to heat the milk evenly, swirling gently to improve consistency. Don’t forget to listen: a steady, gentle hissing indicates proper pressure. During a messy try, I overestimated the air intake, which resulted in large bubbles and dull microfoam. When I slowed down and paid attention to the sound and position, my oat milk became smooth and glossy.
Practice, Test, and Adjust Your Technique
Every espresso machine and milk frother differs slightly. Experiment with wand positioning, angle, and steam pressure to find your ideal method. Keep notes or make small adjustments after each attempt. I recommend steaming small batches initially to get a feel for how your machine behaves. Over time, you’ll develop a sense for the right settings, reducing mess and increasing quality.
For a deeper dive into gear choices that help you perfect your microfoam, check out the best milk frothers and barista gear. Incorporating these tools can streamline your technique and elevate your overall coffee craft.
Many home espresso enthusiasts believe that high price tags guarantee perfect shots or that more complex equipment yields better results. However, in my experience, these assumptions often lead newbies astray. For example, some assume that an expensive espresso machine automatically produces superior espresso, but I’ve found that *machine calibration and technique matter far more* than cost. This misconception can cause people to overspend on gear that doesn’t suit their skill level or space constraints, which can be frustrating and financially draining. Additionally, there’s a common myth that grinding finer always improves extraction. In reality, *overly fine grinds can increase channeling and cause bitter flavors*, especially if the grinder isn’t equipped to handle such settings. A nuanced understanding of grinder settings and bean freshness is essential, as explained in [The importance of grind size and consistency](https://espressotechguide.com/best-coffee-grinders-espresso-machines-for-home-baristas-2025-3).
Beware the trap of equating equipment complexity with better coffee. Sometimes, a straightforward manual setup with proper technique produces superior results compared to overcomplicated machines cluttering your counter. For instance, high-end espresso machines with myriad features might intimidate beginners or tempt unnecessary adjustments. Instead, focus on mastering basic skills like tamping pressure, shot timing, and milk steaming, which often have a greater impact on drink quality than fancy gadgets.
**What most people get wrong about espresso grinders?** They often believe that the more expensive the grinder, the better the coffee. While investment in a quality grinder is crucial, *the key lies in matching the grinder’s burr type, RPM, and grind adjustments to your specific setup*. Conical burr grinders, for instance, are praised for their retention and flavor preservation, but if they turn too fast, they can generate static or heat that degrades coffee quality. As detailed in [Why your grinder matters more than the machine](https://espressotechguide.com/why-your-grinder-matters-more-than-the-machine-2026-review), understanding these nuances makes a significant difference.
When selecting barista gear, especially milk frothers, many overlook the importance of compatibility and ease of use. Affordable handheld frothers can produce silky microfoam once you learn proper technique, contrary to popular belief that only automated frothers are effective. I recommend experimenting with different types, like manual, handheld, or steam wand attachments, to find what best suits your routine. For more insights, see [Ultimate guide to milk frothers for perfect coffee](https://espressotechguide.com/ultimate-guide-to-milk-frothers-barista-gear-for-top-coffee-experience).
Remember, the crux isn’t about having the most expensive gear but understanding and optimizing what you already own. Advanced mistakes, such as choosing an overly fine grind without proper tamping or not calibrating your machine regularly, can ruin shots regardless of equipment quality. Always question common assumptions, experiment your setup, and aim for consistency.
Have you ever fallen into this trap? Let me know in the comments. The more we share insights and nuances, the better our home coffee experiences become.
Investing in quality espresso machines, grinders, and accessories is just the beginning; maintaining them properly ensures longevity, consistent performance, and the best flavor extraction. For example, when I started paying meticulous attention to cleaning and calibrating my grinder regularly, I noticed an immediate improvement in shot clarity and microfoam quality. A well-maintained setup not only saves money over time but also reduces troubleshooting frustrations.
How do I maintain my equipment over time?
When it comes to espresso machines, regular descaling is vital—especially if you have hard water. Using a descaling solution periodically prevents mineral buildup that can clog boilers and affect temperature stability. I’ve found that following manufacturer-specific cleaning protocols outlined in this guide helps me avoid expensive repairs and keeps my machine performing like new. Also, cleaning steam wands immediately after use avoids milk residue buildup, which can cause microbial growth and impact flavor.
For coffee grinders, consistent burr calibration is key. Over time, burrs wear down and can produce uneven grinds, compromising extraction quality. I personally set reminders to re-calibrate my grinder every few months and refer to the expert advice for precise tuning. Regularly cleaning hopper and grinder burrs from coffee oils and dust prevents static and clumping, which can lead to uneven grinds and channelling.
As for milk frothers and barista gear, cleanliness directly affects microfoam quality. Disassemble and soak parts in warm, soapy water weekly, and run a cleaning cycle if your device supports it. For manual or handheld frothers, rinsing immediately after use prevents milk residue from hardening, making future cleaning easier. Checking seals and replacing worn-out gaskets prevents leaks and maintains pressure consistency during steaming.
Emerging trends point toward smart, app-controlled cleaning systems integrated directly into espresso machines, which will automate descaling and maintenance routines, as discussed by industry experts. Seeing the evolution toward self-maintaining equipment suggests that embracing proper upkeep now will prepare you for future innovations.
Take this tip for a spin
Try implementing a monthly cleaning schedule for your grinder and espresso machine—it’s a straightforward step that significantly impacts taste and longevity. Just a few minutes of dedicated maintenance will earn you more consistent shots, richer flavors, and less downtime. For detailed maintenance routines tailored to your gear, visit the comprehensive guide. Start today, and enjoy better coffee tomorrow!
Over the years, I’ve realized that the secret to consistently great coffee isn’t just the equipment but how we develop our habits around steaming milk. One of the biggest breakthroughs for me was understanding that patience and attention to detail trump any fancy gadget. Small adjustments in positioning, steam control, and temperature can turn a burnt, grainy mess into silky microfoam that elevates your entire brew. Remember, it’s not about making the process complicated—it’s about making it personal and deliberate. Keep practicing and fine-tuning your technique, and soon you’ll find yourself effortlessly creating barista-quality drinks at home every day.
![Why 2026 AI Pressure Profiling Fails on Light Roasts [Fix]](https://espressotechguide.com/wp-content/uploads/2026/04/Why-2026-AI-Pressure-Profiling-Fails-on-Light-Roasts-Fix.jpeg)


Leave a Reply