It was a frustrating Saturday morning when I finally admitted defeat—my pour-over coffee tasted dull, flat, and somehow off. No matter how I tweaked my grind size or adjusted the brew time, those stubborn burrs in my grinder just wouldn’t cooperate. That lightbulb moment hit me—maybe, just maybe, I was wasting beans because of an overlooked detail: seasoning the grinder burrs.
Why Seasoning Burrs Could Save Your Coffee
If you’ve ever experienced uneven extraction, inconsistent flavor, or just a general sense that your beans are going to waste, you’re not alone. I’ve been there too. Turns out, grinder burrs—especially when they’re new or after a deep clean—can benefit from a simple process that sharpens their efficiency and enhances flavor. This isn’t some obscure barista trick; it’s a proven method that high-end coffee enthusiasts swear by, and I can personally attest to its impact. Studies suggest that fresh burrs can have high retention of fines, which leads to over-extraction and bitterness in your shot. Proper seasoning can mitigate this problem effectively.
Is Burr Seasoning Really Worth All the Hype?
Honestly, I used to dismiss it. I thought, “It’s just a gimmick,” until I made the mistake of skipping the seasoning process on a set of brand-new burrs. The resulting shots were sour, uneven, and downright disappointing. That realization made me dig deeper—and I learned that many top baristas and home enthusiasts see seasoning as an essential step that prevents wasting precious beans and improves overall flavor. If you’re tired of throwing out beans or battling inconsistent shots, this simple step might just revolutionize your home brewing. Curious about how to do it right? Stick around, because I’ll walk you through the exact process. And if you’re worried it’s another complicated hack, relax—it’s straightforward and worth trying before your next grind session.
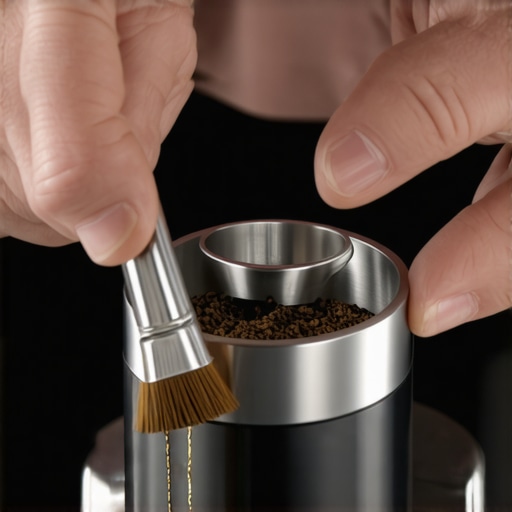
Prepping Your Grinder for Action
Begin by removing your burrs and inspecting them for any packing debris or manufacturing oils. This initial cleaning ensures you don’t introduce unnecessary contaminants into your seasoning process. Use a brush or compressed air to clear out any leftover particles, much like cleaning a camera lens before capturing a shot. This step prevents dirt from interfering with the seasoning process and guarantees a clean surface for oils to adhere to.
Choosing the Right Beans for Seasoning
Select a batch of inexpensive, freshly roasted light beans—these are ideal because they release fewer oils but have enough flavor to saturate the burrs effectively. Avoid flavored or oily beans during this step, as they can create a greasy buildup that hinders performance. Think of this as priming a surface with a neutral primer before painting; it prepares the burrs for the seasoning layer to follow.
Applying the Seasoning Technique
Step-by-step Pour-Over Method
Set your grinder to a medium grind size—similar to granulated sugar—and pour in the beans, then grind for 10-15 seconds. This initial grind coats the burrs with a thin layer of coffee oils and residual particles. Repeat this process for about 5 cycles, gradually increasing the duration if needed. During the first few cycles, expect some static or static-like clinging—this is normal as the burrs start to develop a seasoning layer. As I experienced when I first tried this, I found the process a bit messy, with coffee grounds sparking static cling, but perseverance paid off with improved extraction quality.
Using Consistency and Intention
Keep your grind size consistent and avoid pressing the grind button repeatedly in rapid succession—this simulates a natural, even coating. Think of it like seasoning a pan; you want an even layer without rushing. After the initial cycles, you can run a few more to build up a more robust seasoning. Remember, this isn’t about a quick fix—patience is key. For more insights into proper grinder maintenance, check out this guide on grinder retention.
Final Rinse and Reassembly
Once you’ve completed your seasoning cycles, remove the burrs and brush off any loose coffee particles. Reassemble your grinder carefully, ensuring all parts are securely fitted. Run a few test grinds with your regular beans to see the difference; the seasoned burrs should now produce more consistent particles, leading to better extraction and flavor. Think of this as tuning a musical instrument—you’ll notice how the notes ring clearer. If you want to troubleshoot further, explore this backflushing guide to optimize your whole setup.
Many home baristas believe they need the latest, most expensive gear to brew exceptional coffee, but this is a myth that often leads to overlooked nuances causing subpar results. One prevalent misconception is that higher-priced espresso machines automatically produce better shots, yet factors like proper maintenance and calibration are often more critical. Regularly ignoring routine descaling or misjudging water pressure can nullify the benefits of a high-end machine, leading to bitter or sour extracts. This oversight is especially tempting given the complexity of some machines, causing users to bypass essential upkeep. For example, inadequate backflushing or neglecting group head cleaning can develop internal blockages, reducing pressure consistency and compromising shot quality. Advanced home baristas know that understanding your machine’s internal mechanics—like the significance of the E61 group head or the effects of brew temperature stability—is key to optimizing performance. Misaligned or worn-out burrs in grinders also pose common pitfalls, resulting in inconsistent grind size and uneven extraction, even if your machine is pristine. Recognizing that grinder burrs have a lifespan—often under 500 pounds or after a year of regular use—is vital; neglecting this can cause fines buildup or static cling, adversely affecting your espresso. Moreover, many enthusiasts overlook the importance of pre-infusion and pressure profiling; mastering these techniques can elevate your espresso from good to exceptional, especially on semi-automatic machines with manual controls. Such nuances underscore that gear alone doesn’t guarantee great coffee; understanding the intricacies of your equipment and performing regular maintenance are what truly make a difference. To avoid these advanced mistakes, consider exploring detailed guides on grinder calibration or machine-specific maintenance routines—it could save your beans and your morning ritual. Remember, becoming an expert isn’t just about owning premium gear but mastering its complexities. Have you ever fallen into this trap? Let me know in the comments! For refined practices, check out this guide on common home espresso mistakes.,
Essential Maintenance for Reliable Coffee Equipment
To enjoy consistently excellent espresso and café-quality drinks at home, regular maintenance of your gear is non-negotiable. I personally prioritize deep cleaning my espresso machine and grinder weekly, which involves backflushing the machine with proper cleaning solutions and removing burrs for thorough brushing. These steps prevent buildup that can cause pressure drops or uneven extraction, ensuring every shot is as good as the first. Using manufacturer-recommended descaling solutions and routine replacement of gaskets and seals also prolongs your equipment’s lifespan and prevents costly repairs down the line. For grinders, periodically checking burr alignment and replacing worn burrs are critical to maintain grind consistency, which directly influences shot quality.
Tools That Make Maintenance Easier and More Effective
Investing in quality tools is a game-changer. A dedicated cleaning brush kit tailored for espresso machines makes removing stubborn coffee oils from group heads a breeze. I use a knock box for quick disposal of grounds during cleaning sessions, reducing mess and saving time. For grinder maintenance, a set of precision burr calibration tools helps me keep the grind size sharp and uniform, which is essential when dialing in shots. Few realize that static buildup in grinders can drastically impact coffee flow; applying anti-static brushes or using static-reducing techniques greatly minimizes this issue. Keeping spare parts like screens, gaskets, and seals handy allows quick swaps, reducing downtime and maintaining workflow efficiency.
Future Trends in Home Coffee Maintenance
Looking ahead, automation and smart diagnostics are likely to become standard in high-end home espresso setups. Imagine machines that monitor internal pressure, temperature fluctuations, and component wear, alerting you when maintenance is needed via your smartphone. Companies are already experimenting with IoT-enabled cleaning schedules that optimize maintenance cycles based on usage patterns, which helps maintain peak performance and consistent flavor profiles over the long haul.
How do I keep my gear in top shape over time?
Developing a routine maintenance schedule tailored to your specific equipment is crucial. Regularly inspecting components, cleaning after each use, and scheduling deep cleanings every few weeks can prevent small issues from evolving into costly repairs. Remember to stay updated with manufacturer guidelines—many provide detailed maintenance routines that, if followed, can extend your gear’s lifespan significantly. Also, consider allocating time for calibrating your grinder and machine settings periodically, especially if you notice shifts in shot quality. For a detailed approach, check out this power-saving and maintenance tips designed for high-end setups to ensure longevity and efficiency. Try implementing a monthly clean and calibration routine—you’ll be amazed at the impact on your coffee experience.
What I Wish I Knew About Grinder Secrets That Changed My Coffee
One of the most overlooked yet impactful lessons I learned was that seasoned burrs could make or break your espresso experience. I used to believe that upgrading my machine was the key, but I realized that proper maintenance and seasoning were the real game-changers—saving money and beans in the process. Recognizing the importance of burr condition and not just overall machine quality taught me to pay attention to minor details, leading to consistent, flavorful shots.
My Go-To Tools for Coffee Lovers Who Want to Improve
Investing in a quality burr calibration tool transformed my grind consistency. I trust it because it offers precise adjustments, directly translating to better espresso. A dedicated cleaning brush set makes routine maintenance easier and more effective, preventing static and static cling issues that ruin shots. For in-depth knowledge, books like “The Home Barista’s Guide” have opened my eyes to nuances beyond basic brewing, making me a more confident home barista.
Your Next Step: Elevate Your Coffee Ritual Today
Don’t let overlooked details hold back your coffee mastery. Embrace the simple yet powerful step of burr seasoning, and see how it transforms your espresso. Remember, the pursuit of coffee perfection is ongoing, and small practices can lead to big improvements. Dive into maintenance routines, experiment with seasoning techniques, and watch your coffee journey flourish. Ready to give it a try? Your flavorful future awaits!
![Why 2026 AI Pressure Profiling Fails on Light Roasts [Fix]](https://espressotechguide.com/wp-content/uploads/2026/04/Why-2026-AI-Pressure-Profiling-Fails-on-Light-Roasts-Fix.jpeg)


Leave a Reply