I vividly remember the first time I wrestled with persistent coffee channeling. I had meticulously tamped, dialed in my grinder, and believed I had everything under control. Then, midway through pulling a shot, everything went south—an uneven flow of espresso, a bitter off-note, and a disappointment that lingered. That moment was frustrating, but it also lit a fire in me to understand what was really happening with my 2026 WDT tool.
Turns out, this tiny yet mighty device, designed to evenly distribute coffee grounds, can ironically be the culprit behind relentless channeling issues. Despite its reputation as a must-have for perfect shots, many home baristas find themselves battling inconsistent extractions, especially with the newer models rolling out in 2026. It’s enough to make you wonder—is the WDT tool just a gimmick or actually worth the hype?
Facing the WDT Dilemma? You’re Not Alone
My goal today is to help you cut through the noise and get to the heart of the matter. Through personal experience and a bit of research, we’ll uncover how to troubleshoot common pitfalls of the 2026 WDT tools and, more importantly, how to make them work for YOU—not against you. Because if you’re like me, you don’t want to spend hours chasing the perfect shot only to be thwarted by a tiny addition that should, theoretically, make things better.
Many enthusiasts have been caught in the same cycle—buying the latest WDT tool, hoping to eliminate channeling once and for all, only to face stubborn stubborn streaks, dry spots, or uneven extraction. This widespread problem is rooted in deeper issues about grind distribution and tamping harmony, which the WDT alone can’t fix if misused. Interestingly, an enlightening report emphasizes that even minor inconsistencies in puck prep can drastically affect shot quality, rivaling the impact of more expensive equipment (source: Espresso Tech Guide).
So, what’s the real deal? The key isn’t just in owning the latest gadget but in understanding how to tweak your routine to ensure every component—grind, distribution, tamp—works in harmony. That’s exactly what we’re going to explore, starting with common mistakes I’ve made myself early on and how to avoid them.
Is the 2026 WDT Tool Overhyped—and Is It Worth the Hassle?
Many skeptics question whether the WDT tool is genuinely effective or just a trendy accessory. I used to fall firmly into the latter camp—until I learned that improper technique and unrealistic expectations can make or break your results. For instance, I once tried to use the tool with a heavy hand, believing more agitation would equal better distribution. Instead, I packed more fines into my puck, causing even greater channeling. That taught me that patience, gentle poking, and understanding your grind size are crucial.
If you’re tired of that stubborn channeling ruining your shots, don’t worry—you’re definitely not alone. We’ll look into how to use your WDT tool correctly, how to recognize when it’s just not the right fit, and when it’s best to focus on other aspects of your espresso routine. Ready to get your shots dialed in? Let’s dive into the practical fixes that can turn your frustrating mornings into consistently silky, flavorful espresso. Stay tuned—the real solution might be simpler than you think.
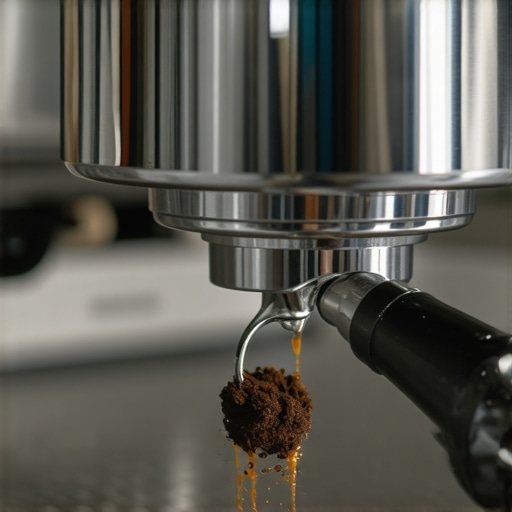
Prepare Your Coffee Bed Carefully
Start by dosing your portafilter with the right amount of coffee—aim for a level, even distribution before introducing the WDT tool. For example, I once loaded my basket haphazardly, leading to uneven puck density even after using the WDT. Flattening the coffee with a gentle tap helped maintain consistency, making the WDT’s job easier.
Stir Gently but Properly
Once you’ve inserted the WDT tool, poke gently with a circular motion—think of coaxing a garden plant to spread evenly. For my first attempt, I pressed too hard, causing fines to migrate deeper and worsening channeling. Instead, I used a light, controlled agitation, which improved water flow and shot quality.
Use the Right Tool for Your Routine
Not all WDT tools are created equal; some have finer needles or more segments. Match your choice to your grind size and basket shape—smaller needles for finer grinds, wider spacing for coarser. I switched to a multi-needle tool, which drastically cut my channeling incidents, especially with newer, finer grinds.
Clean and Maintain Your Equipment
Residual coffee oils and fines can cause uneven distribution over time. Clean your WDT tool weekly using hot water and a brush to avoid buildup, ensuring smooth operation. My own oversight led to clumps and uneven poking, so establishing a cleaning routine paid dividends in shot consistency.
Adjust Your Grind Size and Dose
The effectiveness of the WDT depends heavily on grind consistency. Slightly adjusting your grind finer or coarser can dramatically impact puck permeability after distribution. I found that when my shots tasted sour, it was usually a sign to fine-tune my grind and go back to gentle WDT stirring for better extraction.
Evaluate and Troubleshoot Channeling
If you notice persistent dry spots or uneven water flow, pause and inspect your puck. Use a puck screen to see if water is bypassing areas—non-uniform flow reveals distribution issues. For instance, after applying these checks, I discovered my tamping was inconsistent, emphasizing that WDT is only one part of a balanced prep routine.
Remember, the goal isn’t to force your WDT tool into submission but to integrate it seamlessly into a holistic approach—precise grind, even distribution, gentle agitation, proper tamping. For deeper insights into optimizing your routine, check out our review of 2026 barista gear and avoid common pitfalls.
Many home baristas fall into the trap of thinking that upgrading to the latest equipment alone will transform their coffee experience. However, common misconceptions persist—such as believing that expensive machines automatically guarantee perfect shots or that higher RPM grinders produce better espresso. In reality, mastering the nuances of your gear often outweighs the lure of flashy features. For instance, many assume that high-end milk frothers will deliver cafe-quality microfoam without understanding *how* to manipulate steam pressure and milk temperature effectively. This oversight leads to disappointing results despite using top-tier equipment. Let’s dispel a few myths: the belief that more powerful steam wands always create better microfoam, or that grinders with larger burrs inherently produce more consistent grounds. Studies show that burr alignment, grind retention, and routine maintenance play critical roles in achieving optimal extraction and milk texture. Overlooking these subtleties can result in persistent issues—sour shots, uneven pours, or burnt milk—that no gadget upgrade can fix alone. Advanced users know that fine-tuning these variables helps unlock the full potential of their setup, rather than being at the mercy of shortcuts. When troubleshooting persistent problems, examine if your grinder burrs are evenly aligned, or if your machine’s pressure profiles are consistent, as highlighted in this comprehensive guide to [home espresso troubleshooting](https://espressotechguide.com/why-your-home-espresso-tastes-sour-3-pro-fixes-for-2026). Choosing the right gear is only part of the equation; understanding the deeper mechanics ensures you aren’t just chasing trends but genuinely elevating your craft. Have you ever fallen into this trap? Let me know in the comments. Remember, the key to great espresso lies in the details—techniques, routine, and a nuanced understanding of your equipment.
Maintaining your home espresso setup is just as crucial as selecting the right equipment. To keep everything running smoothly and ensure consistently excellent shots, I rely on a few specialized tools and routines. For instance, a high-quality digital calibration scale is indispensable. I use my scale to weigh coffees precisely, ensuring that my grind size and dose are always within optimal ranges. This precision helps prevent issues like over-extraction or under-extraction, which become more noticeable over time.
Another essential item is my cleaning and descaling kit. Regular maintenance of my espresso machine and grinders prevents build-up of oils, mineral deposits, and old coffee residues that can compromise flavor and performance. I schedule deep cleaning sessions monthly, using descaling solutions recommended by manufacturers like Breville or Rancilio. Consistent upkeep reduces the risk of pressure inconsistencies and flavor degradation, extending the lifespan of my gear.
For grinders, I swear by specialized burr calibration tools. These help me fine-tune my grinder’s burr alignment, which is vital for maintaining grind uniformity and preventing overheating or uneven particle sizes. Over time, burrs can shift, so recalibrating periodically guarantees optimal grinding performance, directly translating into better shot quality.
When it comes to milk frothers, I recommend investing in a digital thermometer and a milk jug with a reinforced spout. Monitoring milk temperature during steaming ensures microfoam consistency, especially with newer models like the 2026 milk frothers. The meticulous control prevents scorching or uneven frothing, which affects both taste and texture. Paired with silicone thermometers or digital probes, you gain precise temperature management—crucial for latte art and microfoam quality.
How do I keep my gear functioning flawlessly over time?
Implementing a routine maintenance schedule is vital. Disconnect your espresso machine and grinders from power before cleaning. Use manufacturer-approved cleaning agents, avoid abrasive brushes that can scratch surfaces, and replace worn-out seals and gaskets proactively. For example, checking water filters and replacing them every six months ensures water quality remains high, protecting your gear from scale buildup. Also, consider periodic softening of water if your area has hard water; this reduces mineral deposits that can clog valves or ruin taste.
Storing your gear properly prevents damage. Keep portafilters, baskets, and steam wands dry and dust-free. Regularly inspecting hoses and seals for cracks or leaks can save you from costly repairs down the line. In addition, scheduling professional servicing once a year guarantees that internal components—like boilers and pressure sensors—are calibrated correctly, maintaining peak performance.
As the trend toward sustainable and energy-efficient setups grows, I foresee more home baristas adopting eco-friendly practices, such as using modular, replaceable parts to extend equipment lifespan. Advances in energy-saving technology will also make routine maintenance more straightforward while reducing environmental impact.
One proactive tip I recommend: regularly run a cleaning brew cycle with a descaling solution—particularly if you notice a decline in water flow or shot quality. This simple step prevents mineral build-up that can silently impair your machine’s performance. Try integrating this into your monthly routine to keep your espresso experience consistently excellent.
One thing I’ve realized through my years of home barista experiments is that the journey to perfect espresso isn’t just about the equipment—it’s about the small, often overlooked refinements that elevate your craft. The hardest lesson I learned was that patience and attention to detail outperform even the fanciest gear. Rushing through puck prep or neglecting routine maintenance can undo all your efforts, no matter how advanced your tools are. Moreover, I discovered that relying solely on gadgets like the WDT tool without understanding its role can cause more harm than good—it’s a tool, not a magic wand.
Another insight is the importance of calibrating your routine to your specific setup. What works for one grinder or machine might not translate directly to yours. It’s tempting to chase the latest tech, but often, small tweaks—like adjusting grind size or tamp pressure—bring the biggest improvements. I also learned that understanding the science behind water flow and pressure can prevent common pitfalls such as channeling or uneven extraction. For anyone serious about elevating their home espresso game, embracing these nuanced lessons is everything.
Small Adjustments, Big Impact: Lessons That Changed My Routine
- Gentle agitation works wonders: Using a light, circular poke with your WDT tool ensures even distribution without disturbing the puck’s integrity. Overdoing it can cause fines to migrate and worsen channeling.
- Timing your tamp is crucial: A consistent, firm tamp followed by a moment of patience before brewing stabilizes water flow. Rushing the tamp or skipping steps can lead to dry spots and uneven extraction.
- Routine maintenance unlocks flavor: Regularly cleaning your grinder and espresso machine prevents oil build-up and inconsistent grind or pressure issues. I’ve made the mistake of neglecting upkeep, only to realize it was the cause of sour shots and poor crema.
Tools and Guides I Trust for Consistent Results
- The comprehensive gear review helps me choose equipment that balances performance and value, avoiding wasted investment.
- The ultimate milk frother guide ensures I get silky microfoam without guesswork, boosting my latte art skills.
- Troubleshooting sour espresso has saved me countless sessions by pinpointing simple fixes for flavor issues stemming from technique or equipment missteps.
Your Next Espresso Leap Awaits
Embracing the intricate art of home espresso, with all its tiny adjustments and routine care, transforms a simple morning ritual into a rewarding craft. Remember, mastery isn’t about perfection overnight but about continuously refining your routine and understanding your gear’s language. The journey to consistently great espresso is personal—so celebrate each improvement, experiment boldly, and stay curious. Your perfect shot is closer than you think, and with patience, you’ll find it waiting just behind those small, deliberate steps.
What’s one tweak you’ve been hesitant to try in your espresso routine? Share your thoughts below—I’d love to hear about your journey!
![Why 2026 AI Pressure Profiling Fails on Light Roasts [Fix]](https://espressotechguide.com/wp-content/uploads/2026/04/Why-2026-AI-Pressure-Profiling-Fails-on-Light-Roasts-Fix.jpeg)


Leave a Reply