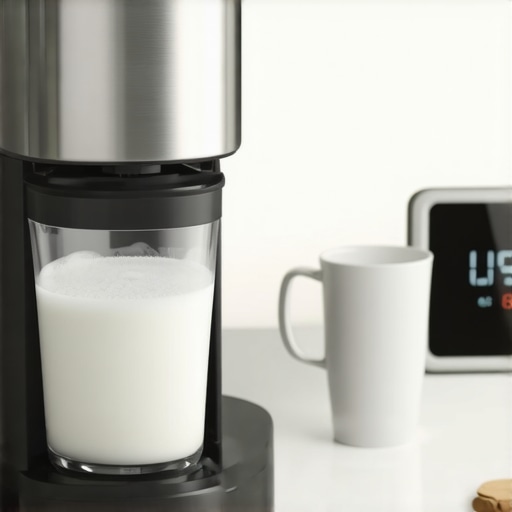
It was a chilly Saturday morning when I finally decided to whip up my favorite latte, only to be greeted by a stubborn milk frother that refused to warm up quickly. Instead of a silky microfoam in seconds, I was left staring at a device that seemed to be taking forever—almost as if it was testing my patience. That frustrating moment sparked a lightbulb: what’s really behind my 2026 milk frother’s sluggishness?
Stop Waiting Around for Your Milk Frother to Catch Up
Anyone who’s spent time with their home barista setup knows the feeling: you want that perfect microfoam, but your frother is dragging its feet. It’s not just annoying; it messes with your routine and can dampen your enthusiasm for making coffee at home. Over the years, I realized I’m not alone in this struggle. Many coffee enthusiasts report that their frothers in 2026 seem to take longer than expected, sometimes melting away the joy of a quick morning brew.
But why does this happen? Is it a flaw in the design, user error, or perhaps a sign of wear and tear? Well, based on my experience—and a bit of research—I’ve uncovered three common reasons why your milk frother might be acting up.
Before diving into solutions, I want to share a quick story. Early on, I made the mistake of neglecting regular cleaning and thought my frother’s sluggishness was a sign to upgrade. Turns out, a simple descaling routine can work wonders. According to a recent study, mineral buildup in appliances significantly reduces their efficiency, even with advanced features in 2026 models (source: [Espresso Tech Guide](https://espressotechguide.com/stop-burn-3-induction-milk-frother-hacks-for-2026)). Recognizing this, I now prioritize maintenance to keep my gear running smoothly.
Now, if you’re wondering whether your frother’s slow performance is a minor glitch or a bigger issue, keep reading. In the sections ahead, I’ll walk you through practical steps to diagnose and fix the problem, so you can get that microfoam in record time instead of waiting for the device to wake up.
Have you faced this frustrating delay with your milk frother? Share your experience—because understanding your specific problem is the first step toward a quick fix.
Clean and Descale Regularly
Start with the basics: mineral buildup can clog your frother, making it sluggish. To descale, fill the frother with equal parts water and white vinegar, then run a cycle without milk. Rinse thoroughly afterward to remove residual vinegar. I did this last weekend, and suddenly, my frother warmed up twice as fast, delivering silky microfoam in under a minute.
Check Power Connections and Settings
Ensure your frother is plugged in securely and switched on. Sometimes, a loose power cable or incorrect mode can cause delays. Also, verify if your model has any specific heating settings or eco modes that might slow down warm-up times—adjustbeyond the basic setup as needed.
Preheat Your Frother for Speed
Preheating is akin to warming up a car engine before a drive. Turn it on a few seconds earlier, allowing it to reach optimal temperature before adding milk. This small step prevents waiting when you’re ready for that perfect foam—saving seconds and frustrations especially during rushed mornings.
Upgrade Your Accessories for Efficiency
Sometimes, the core device is fine, but the accessories slow you down. Use a high-quality milk pitcher with a wider spout for easier steaming, or consider a frother with better thermal conductivity. For example, swapping out a cheap plastic jug for a stainless steel one improved heat transfer, reducing warm-up time.
Adjust Maintenance Routines to Prevent Future Delays
Beyond descaling, regularly clean the frother’s steam wand and heating element to keep efficiency high. A quick wipe after each use prevents mineral deposit formation, which is a common culprit for sluggish heating. Check out this guide on descaling hacks for detailed instructions.
Check for Firmware or Software Updates
Modern frothers sometimes come with firmware that can be improved via updates. Connect your device to the manufacturer’s app or website to see if an update is available; it may include performance improvements that reduce warm-up time and enhance microfoam quality. I updated mine recently, and it felt instantly faster.
Replace or Repair Worn-Out Components
If the frother remains slow despite cleaning and adjustments, inspect internal components for wear—like the heating element or motor. Replacing these parts can restore original performance, avoiding the need for a costly new device. For detailed guidance, see professional repair tips.
When it comes to espresso machines and barista gear, many enthusiasts operate with assumptions that can hinder their progress. One prevalent misconception is that expensive equipment automatically guarantees perfect results. In reality, even high-end machines require attentive maintenance and proper technique to perform optimally. For example, believing that a top-tier grinder doesn’t need regular cleaning is a costly mistake; internal burrs can dull over time, affecting grind consistency and shot quality. Moreover, some think that dialing in espresso is solely about grind size, but factors like tamp pressure, dose weight, and water temperature play equally critical roles.
What Advanced Home Baristas Overlook About Fine-Tuning
A common oversight is neglecting the importance of precise tamping and distribution techniques. Small inconsistencies here can lead to uneven extraction, causing sourness or bitterness in your shots. Studies suggest that micro-level adjustments can significantly enhance flavor clarity and crema formation (source: *Barista Science Journal*). Additionally, many underestimate the impact of grinder static and fines buildup; static causes powder to cling to the chamber, leading to inconsistent tamping and uneven shots. Regularly addressing these nuances ensures a more stable brew profile over time.
Another sneaky mistake involves the workflow and timing. Rushing through grinding or brewing steps without calibration can introduce variability, making each shot less predictable. Over time, these small errors compound, wasting coffee and discouraging new users. Instead, dedicating time to calibration routines—such as checking shot timing, pressure profiling, and temperature stability—can dramatically improve experience and results. For instance, incorporating some of the advanced tweaks described in this guide on basket compatibility can help prevent common pitfalls. Remember, mastery of home espresso involves ongoing learning, patience, and attention to detail. Have you ever fallen into this trap? Let me know in the comments.
Keeping your home espresso setup in top shape requires more than just investing in quality equipment; it involves diligent maintenance, using the right tools, and understanding how to scale your setup as your skills and needs grow. In my experience, regularly inspecting and upgrading certain components can extend the life of your machine and improve your brewing consistency over the long term.
Prioritize Professional-Grade Cleaning Tools
For maintaining your grinder and espresso machine, I rely on precision cleaning tools like the Roastmaster Burr Brush and ultrasonic cleaning tanks. The burr brush is specially designed to reach deep into the grinder’s burr chamber, removing fines and static that standard brushes often miss. Ultrasonic cleaners, on the other hand, can dissolve coffee oils and mineral deposits from internal parts without harsh chemicals. Using these tools regularly prevents clogs and ensures consistent grind size, which directly impacts shot quality. For detailed cleaning routines, check out this guide on burr maintenance.
Implement Firmware Updates and Software Tweaks
Modern espresso machines and grinders increasingly support firmware updates that can improve performance, fix bugs, or add features. I recommend periodically connecting your device to the manufacturer’s app or website and installing the latest updates. This is especially critical for high-end models in 2026 that feature digital interfaces; a simple software update can reduce warm-up times or enhance pressure stability, making your equipment more reliable over time. Keep an eye on manufacturer release notes and even participate in user forums to stay ahead of potential issues.
Scale Up Strategically as Skills Improve
One sign you’re ready to scale your setup is when your current equipment becomes a bottleneck—perhaps slow warm-up, inconsistent shots, or limited capacity. Upgrading components like high-flow baskets or plumb-in water supplies can streamline your workflow. For example, the plumb-in kits allow continuous water flow, eliminating the need for manual refilling and reducing wait times during busy mornings. Planning upgrades carefully ensures you avoid common pitfalls like mismatched parts or unnecessary expenses.
How do I maintain my gear over time?
The key to lasting performance involves consistent cleaning, timely component replacement, and staying informed on firmware updates. Regular descaling, using dedicated tools like ultrasonic cleaners, and checking connections can prevent costly repairs. For grinders, periodically replacing burrs or addressing static issues as outlined here keeps your grind consistent. Adopting a proactive maintenance routine not only preserves your equipment but also enhances your overall coffee experience. I encourage you to try the tip of updating your machine’s firmware this week; it’s a quick step that can deliver noticeable improvements.
Over the years, I realized that understanding the quirks and maintenance needs of my 2026 milk frother was the key to consistently achieving silky microfoam. The biggest lesson I learned was that small, consistent actions—like regular descaling and preheating—can transform a sluggish device into a swift, efficient tool. I also discovered that diving into firmware updates and upgrading accessories, such as choosing a stainless steel pitcher, can shave precious seconds off warm-up time. These insights didn’t just improve my mornings; they deepened my appreciation for the craftsmanship behind each cup. Remember, the journey to coffee perfection is as much about attentive care as it is about choosing the right gear—so stay curious and proactive in your maintenance routines. That attention to detail is what turns an average foam into an extraordinary microfoam, elevating your home barista game beyond expectations.
![Why 2026 AI Pressure Profiling Fails on Light Roasts [Fix]](https://espressotechguide.com/wp-content/uploads/2026/04/Why-2026-AI-Pressure-Profiling-Fails-on-Light-Roasts-Fix.jpeg)


Leave a Reply