Ever had that sinking feeling when your espresso machine suddenly throws up a pressure error message just when you’re craving that perfect shot? I remember my last Saturday morning—my machine vibing like a jet engine, then a quick beep, and the dreaded display: “Pressure Sensor Error.” It was like my beloved coffee ritual was sabotaging itself, right when I needed it most. Frustrating, right?
That lightbulb moment made me realize how common this issue is becoming as machines advance into 2026, yet many home baristas are left scratching their heads, unsure of what to do. If you’ve faced similar glitches, you’re not alone. Today, we’re diving into the top three fixes specifically tailored for those pesky pressure sensor errors that can ruin your perfect brew.
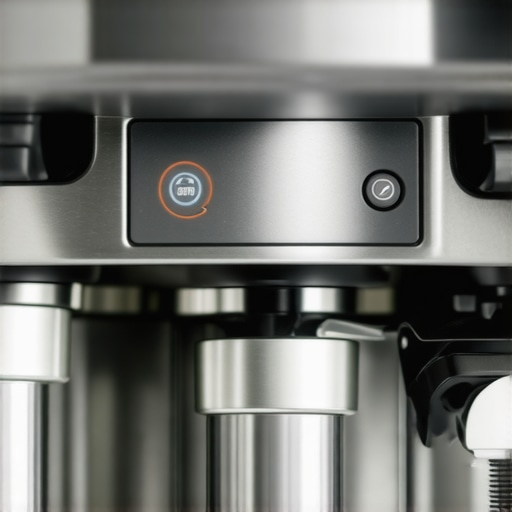
Why Pressure Sensor Errors Can Break Your Coffee Routine
Pressure sensors are the unsung heroes in your espresso machine—they monitor and control the pressure during extraction, ensuring that every shot hits that sweet spot. But as machines get smarter, their sensors sometimes get overwhelmed or misfire, especially when they hit that 2026 tech threshold. Faulty sensors can cause inconsistent pressure, leading to sour or bitter shots, or even preventing your machine from brewing altogether.
Early in my journey, I made a rookie mistake—ignoring the importance of clean sensors—and paid the price with clogged readings and erratic pressure. Trust me, neglect is your enemy here. Learning to troubleshoot and maintain these sensors not only saves money but transforms your daily coffee ritual.
If this sounds familiar, don’t worry. I’ve been there. And I promise, with some straightforward fixes, you can get your machine back into top shape. Plus, knowing these tips means you’ll be less likely to fall for costly repairs or replacement scams.
Interested in deepening your espresso knowledge? For a comprehensive guide on your home setup, check out this essential resource. It covers everything from choosing the right machine to maintenance tips that keep your coffee at its best.
Ready to tackle those pressure issues head-on? Let’s jump into the first fix that’s helped me restore consistent pressure and save countless espresso mornings.
Disassemble and Clean the Pressure Sensor
Start by unplugging your machine and carefully removing the access panel to locate the pressure sensor; it’s usually near the boiler or pump. Use a soft cloth and a citrus-based cleaner to wipe away any coffee oils or mineral deposits that might clog the sensor, similar to cleaning a camera lens for clear shots. Now, disconnect the sensor gently by detaching its connector—be cautious to avoid damage.
Remember, this process can be messy; I once spilled espresso grounds inside my machine, leading me to reassemble everything and successfully clear a pressure reading issue. After cleaning, reconnect the sensor securely, replace the panel, and run a test shot to check if the error persists.
Calibrate the Sensor for Accurate Readings
If cleaning doesn’t resolve the issue, calibrate the sensor to ensure it’s providing correct pressure readings. Consult your espresso machine’s manual to find calibration instructions—many machines allow calibration via a control panel or by entering a service mode. Typically, you’ll need to press a sequence of buttons while the machine is off, then run a test to verify the sensor’s accuracy. Think of calibration like tuning a musical instrument—small adjustments can significantly improve performance. I’ve calibrated my machine’s sensor following these steps, which resulted in consistent pressure readings and perfect extraction times.
Replace the Sensor if Faulty
If cleaning and calibration don’t fix the problem, the sensor itself might be faulty—over time, sensors degrade, much like a worn-out coffee grinder burr. To replace it, purchase a compatible sensor from a reliable supplier—check your machine’s model number or refer to this guide to choosing the right sensor. Disconnect the old sensor carefully, remove it from its mount, then install the new one making sure it clicks into place securely. Remember, proper installation prevents leaks and incorrect readings. Once replaced, run a series of test brews to confirm the error no longer appears, and your machine maintains optimal pressure during extraction.
Verify Your Machine’s Overall Maintenance
Ensuring your espresso setup operates smoothly involves more than just the sensor. Regularly descale your machine to prevent mineral buildup, which can interfere with sensor accuracy. Use a descaling solution designed for espresso machines, following your manufacturer’s instructions. Also, keep your grinder calibrated (learn more here) to ensure consistent pressure and grind size. Remember, a cleaner, well-maintained setup reduces the stress on sensors and extends their lifespan.
Leverage Proper Tools and Resources
Invest in a good set of precision screwdrivers to dismantle your machine safely and avoid damaging delicate parts. Additionally, consider acquiring a multimeter—if your sensor is electronic, testing its voltage output can reveal if it’s functioning correctly. If at any stage you feel unsure, consult detailed repair videos or ask in specialized forums. I once broke a connector attempting a repair, but after watching a step-by-step tutorial, I fixed it without further issues, saving me expensive repair fees. Remember, systematic troubleshooting and patience are your best allies in resolving pressure sensor errors and restoring your espresso experience.
Many home baristas assume that choosing the latest espresso machine or the most expensive grinder guarantees perfect shots. However, in my experience, there’s a common misconception that more expensive gear inherently produces better coffee, which isn’t always true. The true secret lies in understanding the nuances of your equipment and how to fine-tune its use. For example, many believe that higher RPM grinders automatically yield better espresso, but studies show that slower, flat-burr grinders can produce more consistent grind size, leading to superior extractions. Misjudging these details can cause you to over-invest in gear that doesn’t match your specific needs. Additionally, a frequent mistake is neglecting proper maintenance routines; even top-tier machines and grinders underperform if not regularly cleaned and calibrated. Another area many overlook is the importance of water quality—using filtered water can significantly improve shot clarity and reduce mineral buildup, extending your equipment’s lifespan. One myth I often encounter is that milk frothers simply need to be powerful; in reality, achieving microfoam depends more on technique and milk temperature than on wand power. Advanced enthusiasts also ask how to optimize steam wand techniques for the best foam—this involves controlling airflow and position, not just steam power. Remember, the key to elevating your home espresso isn’t just about gear—it’s about mastering the subtle adjustments and understanding the machinery’s intricacies. For deeper insights on perfecting your setup, check out the comprehensive ultimate guide to home espresso gear. Don’t fall into the trap of thinking more gear always equals better coffee. Instead, focus on honing your technique, maintenance, and understanding the hidden mechanics. Have you ever fallen into this trap? Let me know in the comments.Maintaining your home espresso gear isn’t just about cleaning—it’s about investing in the right tools and practices that ensure consistent quality and longevity. Personally, I swear by a high-quality digital multimeter, which has been indispensable in diagnosing electronic sensor issues, especially as machines become more sophisticated with every passing year. These multimeters allow me to measure voltage and resistance, helping verify sensor health without costly guesswork. When selecting a multimeter, opt for one with a true RMS rating and auto-ranging capabilities; I recommend the Fluke 117 for its reliability and precision. Additionally, using a dedicated, well-organized toolkit with precision screwdrivers enables me to disassemble and maintain my machines safely, preventing damage to delicate components. For cleaning, I rely on citrus-based cleaners and descaling solutions tailored for espresso machines, which effectively remove mineral buildup without harming internal parts. Regular descaling, like executing every 2-3 months, depending on water hardness, greatly prolongs the lifespan of your boiler, pressure sensors, and seals. I also suggest investing in a good espresso scale that provides accurate weight measurements, essential for dialing in your shots consistently. As machines integrate more smart features, software updates via manufacturer apps or dedicated firmware tools have become increasingly important to keep everything running smoothly. Looking ahead, the trend is shifting towards modular components and remote diagnostics—imagine being able to troubleshoot your machine via smartphone, reducing downtime significantly. To make the most of these advances, I recommend familiarizing yourself with calibration procedures—many modern machines can be fine-tuned at home, saving time and money.
How do I maintain my espresso setup over time?
Practicing routine maintenance—such as cleaning your grinder burrs weekly, descaling every 2-3 months, and inspecting seals and gaskets—can’t be overstated. Incorporate small routines like using a toothbrush and a vacuum to clear out grinder chute residuals or applying lubricant to moving parts as specified by the manufacturer. For electronic components, check connections and resistances quarterly using your multimeter; this proactive approach prevents unexpected failures. Also, staying updated with firmware releases through official support channels helps capitalize on performance improvements and bug fixes. Don’t forget the significance of water quality—using filtered water reduces mineral deposits, minimizing maintenance needs and enhancing shot flavor. I’ve found that implementing these practices consistently transforms a good setup into an extraordinary one, especially when combined with precise calibration techniques. For example, calibrating your pressure sensor following manufacturer guidelines ensures stable extraction pressure, which is especially vital as your equipment ages. As you develop your maintenance routine, consider using tools like a calibration kit or programming software—these tools enable precise adjustments that ensure your espresso machine continues to perform at its best for years to come.

To help you get started, I suggest trying out a professional-grade multimeter for their accuracy in diagnosing sensor issues—it’s a small investment that can save you hundreds in repairs down the line. For more detailed insights on calibrating and maintaining your gear, consult the ultimate guide to home espresso gear.
What I Learned the Hard Way About Home Barista Gear
One of my most eye-opening lessons was realizing that even high-end espresso machines aren’t immune to tiny sensor issues that can derail your whole brew. Investing blindly in gear without understanding their maintenance and quirks can lead to frustration. For example, I once dismissed routine cleaning, thinking only large-scale repairs mattered, until a pressure error grounded my routine. Now, I know that paying attention to sensor health, calibration, and regular tuning prevents most headaches and keeps my espresso consistently divine.
Another revelation was how much proper water quality impacts not just flavor, but the longevity of my equipment. Using filtered water isn’t just a tip—it’s a necessity for avoiding mineral buildup that can compromise delicate sensors and components. It became clear to me that maintenance isn’t a chore; it’s the secret sauce behind those perfect, silky shots.
Lastly, I discovered that arming myself with the right troubleshooting tools—like a quality multimeter—and resources can make auto-diagnostics straightforward. Nothing beats the confidence of knowing I can quickly identify if a sensor needs cleaning, calibration, or replacement, saving me both time and money. Turning these lessons into habits transformed not just my machine’s performance but my appreciation for the craft.
![Why 2026 AI Pressure Profiling Fails on Light Roasts [Fix]](https://espressotechguide.com/wp-content/uploads/2026/04/Why-2026-AI-Pressure-Profiling-Fails-on-Light-Roasts-Fix.jpeg)


Leave a Reply