The Error of Tamping Too Hard When Using a Precision Basket
Picture this: I was rushing to finish my morning ritual, tamping the coffee grounds into my espresso basket with more force than necessary. Suddenly, I felt a stubborn resistance, and my shot tasted bitter, flat, and lacking that beautiful crema I was chasing. It dawned on me—sometimes, pressing too hard can sabotage your espresso, not improve it. Have you ever experienced a similar frustration after trying to pack your coffee with brute force? You’re not alone, and today, I’m going to share how a simple tweak can make all the difference.
Why Tamping Too Hard Is a Mistake Most Home Baristas Make
When I started exploring barista techniques, I thought that applying maximum force would guarantee better extraction. After all, what’s the point of all those fancy tampers if not to compress the coffee properly? But as I learned, over-tamping can lead to uneven water flow and underwhelming results. In fact, according to a study published by the Specialty Coffee Association, excessive compression increases the risk of channeling, which causes the water to bypass the coffee instead of extracting the full flavor. That means all your effort might be wasted, leaving you with a weak and bitter shot. The secret is in finding the right balance—pressing just enough to create uniform resistance without crushing the coffee too tightly.
Is Tamping Too Hard Really Worth the Hype?
Let me be honest—I used to believe that more pressure would be better. My early mistake was thinking that a tight tamp would produce a richer shot. I even adjusted my grinder settings to compensate for my overzealous tamping, which only led to inconsistencies. It wasn’t until I watched a barista demonstrate that I realized the importance of technique over brute strength. Proper tamping is about control, not brute force. If you’ve ever struggled with uneven shots or a puck that crumbles apart mid-brew, chances are you’re applying too much pressure. Want to upgrade your tamping game? Check out some tips on how to choose the best barista gear for your setup, or learn about the secret to perfectly polished steam wands for better microfoam.
Now that I’ve shared a bit of my journey and the pitfalls of over-tamping, let’s dive into how you can master the art of perfect tamping without overdoing it—because your taste buds will thank you.
,
Apply Consistent Pressure with Purpose
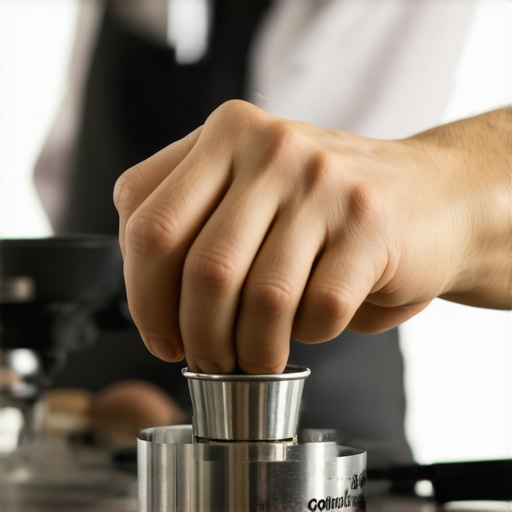
Start by gripping your tamper firmly with your dominant hand, ensuring a relaxed but controlled grip. Position it directly over the center of your coffee puck. As you press down, use your body weight—lean slightly forward—rather than just your wrist. The goal is to apply about 30 pounds of pressure, which is enough to create uniform resistance without over-compressing. Pro tip: Practice on a bathroom scale to get a feel for what 30 pounds feels like. I remember once applying too much force in a rush, resulting in a puck that was too tight, leading to slow water flow and under-extracted espresso.
Achieve Flat and Even Tamp Surface
Ensure your tamp is level by applying even pressure across the entire surface. Use a tamping station or a level tamper to help maintain uniform pressure and flatness. Tap the tamper gently after initial pressing to settle the coffee grounds, then reapply pressure until the puck feels firm and level. Think of tamping like pressing a stamp: if uneven, your shot will be uneven as well. I once skipped this step and ended up with a channeling problem, which made my shot bitter and thin.
Fine-Tune Your Technique Based on Grind Size
The grind size influences how much resistance you encounter when tamping. Finer grinds require a gentler press, while coarser grinds may need a little more force for a tight puck. When adjusting grind size, always test tamping pressure to maintain consistency. Check your grinder settings regularly—see this guide—to ensure your grind matches your tamping style. I once adjusted my grind coarser and over-tamped, resulting in a weak shot. Balancing grind and tamp strength is key to espresso perfection.
Practice and Develop Tamping Confidence
Consistent practice is essential. Set aside time to tamp repeatedly, focusing on pressure, levelness, and consistency. Use a tamping mat to prevent mess and keep your workspace clean. Record your results—note how different pressures or tamping styles affect flavor. I dedicated an afternoon to practicing tamping with a kitchen scale, which helped me develop an intuitive sense of the right force. Soon, tamping became second nature, and my shots improved dramatically.
Remember, tamping is an art refined through mindful practice. Avoid rushes and focus on controlled, deliberate presses. For more tips on dialing in your setup, check out this resource and elevate your espresso game.
Many enthusiasts believe that investing in a high-end milk frother or a top-tier espresso machine guarantees perfect coffee every time. However, what most people get wrong isn’t just about gear quality but sneaky nuances that can sabotage your brewing process. For instance, a common myth is that all coffee grinders are created equal; in reality, selecting the right grinder involves understanding grind consistency and retention issues. Overlooking these details often leads to uneven extraction and bitter shots, even on expensive equipment.
Are Your Barista Tools Sabotaging Your Brew?
One underrated mistake is ignoring the maintenance and calibration of your gear. An espresso machine that’s not correctly calibrated or a grinder with burrs clogged by stale coffee can drastically affect taste. Regularly calibrating your grinder or cleaning your steam wand (learn how to keep your steam wand pristine) ensures consistency and prevents flavor deterioration. Don’t fall into the trap of assuming that high-tech equipment doesn’t need routine upkeep — this often leads to unexpected flavor profiles that confuse even seasoned baristas. Moreover, many home baristas think that better equipment replaces the need for skill. The truth is, even the most sophisticated gear requires a nuanced understanding to optimize performance. This is especially true for espresso machines, where subtle adjustments in pressure and temperature make a difference, a topic I cover extensively in my guide to top-rated espresso machines in 2025.
Why Do Some Milk Frothers Fail to Deliver?”
Many people assume that all milk frothers will produce silky microfoam, but this isn’t the case. The real secret is in the design and how you use them. For example, handheld frothers often produce inconsistent froth because users don’t master the technique—stirring speed, milk temperature, and container shape matter. A common mistake is using cold milk straight from the fridge, which hampers foam formation. Instead, warming milk slightly before frothing can significantly improve texture (discover how to get better microfoam)). Additionally, some believe that more foam equals better presentation—this isn’t true; overly thick foam can hinder latte art and affect the overall drinking experience. For precision, consider investing in a steam wand with a polished tip (learn the secret to polished steam wands) and practicing consistent technique. Remember, mastering frothing takes intentional practice, not just equipment investments.
Being aware of these nuanced details allows even casual home baristas to elevate their coffee game. It’s worth revisiting your gear with a critical eye—cleaning, calibration, and technique make all the difference. Don’t settle for average when small adjustments can unlock extraordinary flavor. Want to deepen your mastery? Check out my comprehensive guide on mastering home espresso and join the ranks of coffee connoisseurs who understand the importance of subtlety. Have you ever fallen into this trap? Let me know in the comments.
Keep Your Equipment in Peak Condition
Investing in quality barista gear is just the beginning. Regular maintenance is crucial to ensure your espresso machine and grinder deliver consistent results over the years. For instance, I personally swear by weekly descaling routines using manufacturer-approved solutions, which prevent mineral buildup and keep water flow optimal. Clean your grinder’s burrs thoroughly every month to avoid flavor contamination, especially if you switch between different coffee beans. According to a detailed guide I follow (calibrating your scale ensures accurate dosing, which is fundamental for repeatability). Remember, a little preventative maintenance saves money and hassle down the line, and it’s easier to do than most people think.
Tools I Recommend for Consistency and Precision
For precision dosing, I rely on a high-quality espresso scale that offers 0.1-gram accuracy. This helps me dial in my grind and tamp pressure meticulously. When it comes to grinder calibration, I use a calibration weight set, which allows me to verify and adjust burr alignment without guesswork. For steaming, a thermometer at the wand tip ensures I don’t overheat milk, maintaining microfoam quality. Additionally, I highly suggest a puck conditioning tool—like a WDT (Weiss Distribution Technique) needle—to break apart clumps before tamping, resulting in more uniform extraction. You can read more about this technique in-depth (here), which revolutionized my brew consistency.
Keeping Your Tools in Top Shape
Even the best tools need routine checkups. Clean your steam wand with a specialized brush weekly (this cleaning method) and replace worn gaskets to prevent leaks. For grinders, disassemble the burrs biannually for deep cleaning to prevent flavor carryover and static buildup that can impede bean flow (see how). My go-to maintenance kit includes a burr cleaning brush, lubricant for moving parts, and descaling solutions — all of which contribute significantly to extending equipment lifespan.
Future of Home Barista Tools
As technology advances, I predict more automation features like smart calibration and maintenance alerts will become standard, reducing guesswork and improving consistency. These innovations will enable even amateur enthusiasts to replicate professional-grade results with minimal effort. Brands are increasingly integrating IoT capabilities, allowing remote diagnostics and routine checks via smartphone apps, dedicated to keeping your machine performing flawlessly.
How do I maintain my espresso setup over time?
The key is establishing a simple, regular routine: daily rinsing, weekly deep cleaning, monthly calibration, and periodic part replacements. Scheduling these tasks prevents wear and deteriorations that could otherwise undermine your brew quality. Don’t forget to keep a detailed maintenance log; it helps identify recurring issues early and plan upgrades smartly. To learn more about maintenance best practices, visit this in-depth guide. For an advanced tip, try calibrating your grinder with a precise weight every quarter—accuracy here impacts everything from shot clarity to crema richness. Start incorporating these habits today, and your setup will reward you with impeccable results for years to come.
As I reflect on my journey to espresso excellence, one lesson stands out as truly transformative: the importance of applying intentional, balanced pressure during tamping. The moment I stopped chasing maximum force and started focusing on control, my shots became consistently richer, with better crema and more vibrant flavor. This insight didn’t just improve my brewing; it shifted my entire perspective on barista techniques. Remember, in espresso craftsmanship, subtlety often outweighs strength, and mastering that balance is the key to unlocking extraordinary coffee at home.
What I Wish I Knew About Tamping When I Started
- The Myth of Power: I used to think that pressing harder would extract more flavor. Turns out, over-tamping causes uneven water flow, channeling, and bitterness. The real trick is harmony, not force. Learn why over-tamping hurts your shots.
- Consistency Over Pressure: Replicating the same tamp pressure took me months of practice. Using a bathroom scale to simulate 30 pounds of pressure helped me develop a natural feel and avoid guesswork. Trust me, this small step changed everything.
- Level Matters More Than Looks: An uneven tamp is a recipe for disaster. Ensuring your puck is flat guarantees uniform extraction and better flavor. Investing in a leveling tamper or using a tamping station will save you headaches down the line.
- Grind Size and Tamping are a Duo: Fine grinders require a gentler touch, while coarser grinds can handle slightly more pressure. Adjusting both variables in tandem is essential for dialing in your perfect shot. Want to refine your grind? Check out this guide.
- Patience and Repetition Build Skill: Like any craft, mastering tamping takes deliberate practice. Dedicate time, record your results, and observe how small adjustments influence flavor. Over time, you’ll find your rhythm and develop confidence that no gadget can replace.
Gear and Techniques for Next-Level Results
If you’re serious about elevating your espresso game, focusing on quality tools and proper technique is non-negotiable. A well-calibrated tamper, an even tamping station, and a good scale are your best friends. Remember, gear alone won’t make perfect espresso — it’s how you use it. To understand how to choose the right barista gear, explore this comprehensive resource. And for tips on maintaining your setup, see this article.
Your Turn to Elevate the Art of Tamping
Now that you know the significance of a gentle, controlled press, it’s time to put that knowledge into action. Experiment, be mindful, and celebrate small improvements. Remember, the journey to perfect espresso is as rewarding as the final shot. Ready to take your home brewing to new heights? The flavors, aromas, and satisfaction are worth it. Share your tamping experiences below—did a slight adjustment make a difference for you? I’d love to hear your stories!