How to Clean Your Grinder’s Discharge Chute with a Pipe Cleaner
I stood there at 6:00 AM, clutching a bag of specialty beans I’d paid way too much for, expecting a flavor explosion. Instead? It tasted like a dusty garage. I realized then that my grinder was lying to me. I thought I was getting fresh grounds, but my grinder was retaining more coffee than I ever imagined. The culprit wasn’t the burrs; it was that narrow, dark tunnel known as the discharge chute.
Stop Letting Stale Grounds Sabotage Your Morning Espresso
I’ll be honest: I used to be the guy who just whacked the side of the machine and hoped for the best. I even tried sticking a toothpick up there once—don’t do that. It snapped, and I spent an hour clearing a jammed chute without losing my cool. We spend hundreds on top-rated espresso machines, but we neglect the one-inch path the coffee actually travels. Today, I’m going to show you why a simple, flexible pipe cleaner is the secret weapon you’ve been missing. It’s cheap, it’s effective, and it’s the only thing that really gets into those tight corners.
Is a tiny pipe cleaner actually better than professional tools?
You might think this sounds a bit too simple for a high-end setup. Why not use those expensive specialized brushes? Well, most brushes are too stiff or too thick. They end up pushing the gunk further in rather than pulling it out. I learned this the hard way after my dosing cup kept catching on the chute because of built-up, compressed oils. A pipe cleaner is wire-core and fuzzy; it grabs the oils and the fines that a nylon brush just glides over. According to researchers at the Coffee Science Foundation, those trapped oils can oxidize in as little as 24 hours, turning your sweet light roast into a bitter, rancid mess. Have you ever noticed a weird, metallic or “old” taste even when using fresh beans? That’s the chute talking to you. It’s time we silenced it. This is the best way to clean a grinder without taking it apart and potentially ruining your calibration. Let’s get into how to do this right without making a mess on your counter.
Get the Gunk Out Without Stripping the Screws
I remember the first time I tried a deep clean on my professional-grade grinder. I was convinced I needed to disassemble the entire housing, armed with three different screwdrivers and a bowl for the tiny parts I’d inevitably lose. Halfway through, a spring shot across the room, and I spent twenty minutes on my hands and knees searching for it. It was a complete disaster. That’s when a veteran barista told me that 90% of my flavor issues lived in the last inch of the machine—the discharge chute. Using a pipe cleaner is the best way to clean a grinder without taking it apart and risking a mechanical meltdown or losing your calibration.
Turn the Power Off Before You Dig In
It sounds obvious, but when you’re in the flow of mastering the art of home espresso tips for beginners, you might forget the basics. Never stick anything—even a soft pipe cleaner—into a grinder that is plugged in. If that motor kicks on while your tool is in the chute, you’re looking at a jammed burr or a snapped wire. Start by emptying the hopper completely. If you have beans left in there, you’ll just create a fresh avalanche of grounds the second you start cleaning. Use a small handheld vacuum to suck out any loose bits from the top before you address the exit point.
Shape Your Tool Like a Tiny Hook
Take your pipe cleaner—the 12-inch variety works best—and fold the last half-inch over to create a small “J” hook. This double-layer of fuzz gives you more surface area to grab those stubborn, oily fines. If you leave it as a straight point, you might just poke a hole through the build-up rather than removing it. The hook acts like a miniature rake to pull debris toward you. 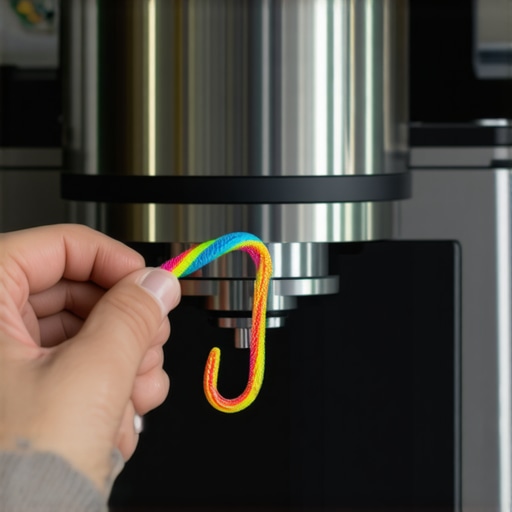 When you’re choosing the best barista gear for coffee enthusiasts, don’t overlook these simple hardware store finds that often outperform expensive specialty brushes.
Sweep and Pull—Don’t Just Push
Insert the hooked end into the chute and gently wiggle it. You aren’t trying to ram it into the burrs; you are clearing the walls of the exit path. Pull the pipe cleaner out, and you’ll likely see a dark, greasy smudge on the fuzz. That’s the oxidized oil that makes your coffee taste like burnt rubber. This is also the secret to figuring out why your coffee grounds are clumping together. Often, those clumps aren’t caused by static; they are caused by new grounds trying to squeeze past a “wall” of old, sticky coffee. Repeat this three or four times until the pipe cleaner comes out looking relatively clean.
The Purge That Saves Your First Shot
Once the chute is clear, you need to run a small sacrifice dose. Grind about 5 grams of fresh beans. This pushes out any loosened dust that the pipe cleaner didn’t quite grab. This is the best way to clean a grinder without losing your settings, as you haven’t touched the adjustment collar or shifted the burr alignment. If you skipped this, your first espresso of the day would be a mix of fresh beans and the stale crust you just knocked loose. This simple step ensures that when you use your top-rated espresso machines for coffee lovers in 2025, the flow is perfectly unimpeded and the flavor remains vibrant and sweet.
Stop Putting Uncooked Rice in Your Expensive Burrs
I’ve seen people spend weeks researching how to select the perfect coffee grinder for your brew only to ruin the motor in a single afternoon by following a viral ‘rice cleaning’ tutorial. This is one of the most dangerous myths in the coffee world. White rice is significantly denser and harder than roasted coffee beans; it doesn’t just scrub the burrs, it puts immense torque on the drive shaft. Even worse, rice starch is hygroscopic. When that dust hits the residual moisture inside your grinder, it creates a paste that hardens like concrete. You should why you should never use rice to clean your high-end grinder if you want to avoid a costly repair bill. Real expertise isn’t just about the gear you buy, but knowing which ‘budget hacks’ are actually mechanical hazards.
The Seasoning Myth That Ruins Your Flavor Profile
There is a persistent contrarian view among some enthusiasts that you should rarely clean your grinder because the oils ‘season’ the metal and prevent static. In my experience, this is a recipe for a flavor disaster. Those oils don’t stay sweet; they oxidize and turn rancid within days. If you’ve ever wondered why your espresso tastes burnt even with light roast beans, it is often because new coffee is picking up the ghost of rancid oils trapped in the burr housing. When choosing the best barista gear for coffee enthusiasts, you must prioritize a workflow that allows for easy access to the chute, rather than looking for a machine that claims to be ‘maintenance-free.’
Why your grinder burrs are getting hot during a single dose?
Even if your discharge chute is perfectly clear, the physical temperature of your burrs can sabotage your extraction. According to data from the Specialty Coffee Association (SCA), friction-induced heat in a grinder can reach temperatures high enough to alter the delicate lipid structure of the beans before they ever reach the portafilter. This thermal expansion can actually shift your grind size mid-dose. If you’ve noticed why your grinder settings feel like they changed overnight, it might just be the ambient room temperature or the heat from back-to-back shots. This is why many high-end commercial grinders utilize active cooling fans; at home, the best fix is simply to allow a few minutes between shots to let the metal cool down.
Don’t Let Stagnant Water Ruin Your Return
The biggest ‘oops’ factor usually happens after a vacation. You come back, fire up the machine, and wonder why your espresso shot tastes like plastic after a long storage. It’s a common trap to assume the machine’s internals are failing, but it’s usually just the water sitting in the copper or stainless steel boiler absorbing the characteristics of the seals and plumbing. A similar surprise often follows a maintenance cycle, such as the reason your espresso tastes metallic after descaling. If you don’t flush the system with at least three full reservoirs of water, you’re drinking residual citric acid. These nuances are what separate a frustrating morning from a perfect cup. Have you ever fallen into this trap? Let me know in the comments.
Protect Your Investment with Better Seals
I used to think that a deep clean once a year was enough to keep my setup in peak condition. I was wrong. Maintenance isn’t a chore; it’s the only way to protect the investment you made when choosing the best barista gear for coffee enthusiasts. If you’ve noticed why your group head gasket is leaking after just one month, it’s usually because of heat-hardened rubber or a build-up of coffee oils that act like sandpaper against the seal. I personally switched to food-grade silicone gaskets because they remain pliable indefinitely and don’t bake onto the group head like traditional rubber ones. It’s a five-dollar fix that prevents a five-hundred-dollar headache.
Daily Habits for a Lifetime of Clean Coffee
Consistency comes down to the daily purge. Before and after every shot, you need to clear the path. I’ve seen so many people struggle with why your group head shower screen is getting clogged so fast because they skip the three-second flush after pulling a shot. This prevents the suction from the 3-way solenoid valve from pulling old coffee grounds back up into the internal plumbing. When it comes to the steam wand, knowing the best way to purge your steam wand without getting burned is essential for hygiene. If you don’t clear the condensation before frothing, you’re just adding a teaspoon of stale, metallic water directly into your milk. This same level of care applies to milk frothers that transform your coffee experience; if you don’t wipe them immediately, you’ll spend twenty minutes wondering how to stop your milk frother from burning the bottom of the jug later that afternoon.
How do I maintain my espresso machine’s performance over time?
The key is a tiered approach: daily flushes, weekly backflushing with detergent, and quarterly inspections of the water filtration. According to the ‘Water for Coffee’ research by Maxwell Colonna-Dashwood and Christopher Hendon, the precise magnesium-to-calcium ratio in your water doesn’t just affect flavor; it dictates the rate of scale accumulation in your boiler. This is why I always use a BWT or similar resin-exchange filter to protect the heating elements. Without proper water management, even top-rated espresso machines for coffee lovers in 2025 will suffer from flow issues within eighteen months.
The Future of Smart Maintenance
I predict we are moving toward a new era of ‘smart’ maintenance alerts. In the next few years, I expect to see more machines using high-precision flow-rate sensors to tell you exactly when a descaling cycle is necessary based on mineral accumulation, rather than just guessing based on a simple timer. We are already seeing this in high-end commercial gear, and it will trickle down to the home enthusiast soon. This level of data will take the guesswork out of ownership and ensure your machine lasts for decades rather than just a few years. My advice? This weekend, take five minutes to pull your shower screen and soak it in backflush detergent—you’ll be shocked at what’s been hiding behind that metal mesh and how much better your next shot will taste.
Why My Best Espresso Secrets Came from the Trash Can
Over the years, I’ve realized that the most expensive equipment doesn’t guarantee the best results if you ignore the basics. First, the discharge chute is the real gatekeeper. You can have the finest burrs, but if the exit path is clogged with old oils, your flavor profile is ruined. Second, noise is a diagnostic tool. If you know how to quiet a loud grinder using only a rubber mat, you will start to hear the subtle changes in motor strain that signal a deep clean is overdue. Third, the smallest mechanical tweaks make the biggest ergonomic difference, like using the simple shim fix for a loose portafilter handle to stop that annoying rattle. Finally, remember that your equipment is a system; a clean grinder with bad water still yields a poor cup.
The Minimalist Kit for a Flawless Setup
You do not need a massive toolbox to maintain a professional standard. My daily workflow relies on these specific items: 12-inch Pipe Cleaners (the thicker the better) for reaching deep into the chute without disassembly; Food-grade Silicone Gaskets which are the move for better espresso without buying a new machine because they do not perish under extreme heat; and a BWT Water Pitcher. I also highly recommend reading ‘Water for Coffee’ by Maxwell Colonna-Dashwood; it is the definitive guide when choosing the best barista gear for coffee enthusiasts who are serious about mineral balance.
#IMAGE_PLACEHOLDER_E#
Build a Routine That Respects the Bean
Great coffee is not a destination; it is a series of small, intentional habits. By taking care of your grinder chute and purging your steam wand, you are not just performing maintenance—you are ensuring that the hard work of the farmers and roasters actually makes it into your cup. As you continue mastering the art of home espresso tips for beginners, you will find that these five-minute tasks are what truly transform a ‘good’ shot into an unforgettable one. Don’t be afraid of the technical side; your machine is designed to be cared for, and it will reward your attention with every sweet, syrupy extraction. What is the one cleaning step you always tend to skip or forget? Let me know in the comments below!